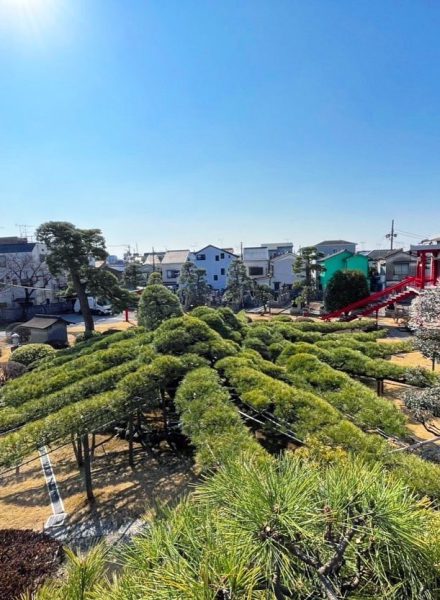
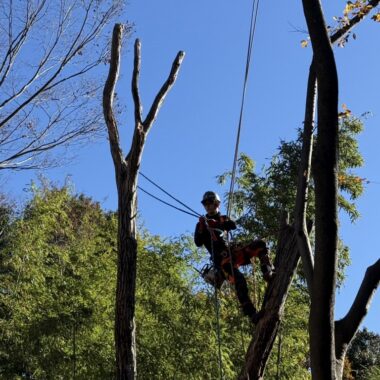
大透かし・中透かし・小透かしは、日本の庭師・植木屋の透かし剪定を、抜く枝の太さで3つに分けた呼び方です。太い枝で木の骨格を整え、中くらいの枝で込み合いをほどき、枝先の小枝で仕上げる。その順序と量の考え方を、行政の剪定基準と海外の資料に照らして図解します。
日本の庭師・植木屋の剪定技術の連載、6回目です。これまでに、透かし剪定の考え方、枝抜き剪定と切り戻し剪定という2つの切り方を書きました。今回は、その枝抜きを「どの太さの枝で行うか」という段階の話です。後半に英語の全文を載せています。
透かしは、抜く枝の太さで3つに分かれる
木の枝は、幹から出る太い主枝、主枝から分かれる副主枝、その先に付く側枝や小枝という順に、一段ずつ細くなっていきます。透かし剪定(枝抜き剪定)は、この骨格を保ったまま、込み合った枝を分かれ目から抜いて、枝葉の量と密度を整える剪定です。
どの段の枝で抜くかによって、呼び方が変わります。主枝の先から副主枝にかけての太い枝を分かれ目から抜くのが大透かし、副主枝の分かれ目から抜くのが中透かし、枝先の側枝だけを抜くのが小透かしです(国総研の街路樹の倒伏対策の手引き、埼玉県の街路樹剪定マニュアル)。主枝そのものを幹から切り落とすのは、枝おろしといって、透かしとは分けて考えます。

3つは別々の技術というより、1本の木の手入れの中で、太い所から細い所へと順に使い分けるものです。毎年の手入れでは、中透かしと小透かしを組み合わせて行うのが一般的です(埼玉県の街路樹剪定マニュアル)。大透かしは、それでは追いつかないほど込み合った木に使います。
大透かし──木の骨格を整える
何年も透かしていない木は、樹冠の内側まで葉がびっしり詰まり、外から見ると丸く重たい塊になります。内側の枝は光が届かずに弱り、枝どうしがこすれ合い、風が抜けません。

こうした木では、まず太い枝で大きな込み合いをほどきます。樹冠の内側へ向かう太い枝、ほかの太い枝と重なる枝を、主枝から分かれる付け根で抜きます。切る位置は、枝の付け根のふくらみ(ブランチカラー)のすぐ外側です(剪定の切る位置はブランチカラー)。

大透かしを終えると、外形はほとんど変わらないまま、樹冠の内側に大きなすき間ができ、幹と主枝の分かれ方が見えるようになります。枝先の細かな込み合いは、まだ残っています。ここから先を、中透かしと小透かしで整えていきます。

太い枝を抜けば、切り口も大きくなります。当社の現場での目安として、庭木で大透かしをするのは、長く手入れされていなかった木を作り直すときなど、数年に一度です。現場での経験から、大透かしの切り口は、残る枝の陰に隠れる位置を選ぶと、外から見て目立ちません。
中透かし──副主枝の分かれ目で、込み合いをほどく
中透かしは、主枝から分かれた副主枝の段で、込み合った枝を分かれ目から抜く透かしです。重なり合う枝、内側へ向かう枝、ほかの枝と平行に並ぶ枝などを抜き、残す枝が主枝の左右に間隔をあけて並ぶようにします。抜く枝の見分け方は、忌み枝の記事で書いた考え方と同じです。

街路樹の枝抜き剪定でも、込み過ぎた部分は「中すかし」で透かします(東京都の標準仕様書)。庭木の手入れでも、毎年の透かしの中心になるのは、この中透かしです。
小透かし──枝先の小枝で仕上げる
小透かしは、枝先の側枝や小枝だけを抜く透かしです。込み合って重なる小枝、下を向く小枝、弱った細い小枝を付け根から抜き、残る小枝が扇のように広がって、葉の塊の間に小さなすき間ができるようにします。

細い枝なので、植木鋏(木鋏)で1本ずつ抜いていきます。片方の手で枝先を軽く持ち上げ、葉の向こうの小枝の付け根を確かめてから鋏を入れます。木の外から見たときの印象を最後に決めるのは、この小透かしの手仕事です。

順序と量──太い枝から細い枝へ、上から下へ
透かしの順序には決まりがあります。太い枝から細い枝へ、という順です。一般的には、枝おろし、枝抜き、切返し、切り詰めの順に進めます(横浜市の仕様書)。高さの方向では、上の枝から中ほどの枝、下の枝へと進め、上の枝葉は強めに、下の枝葉は弱めに透かします(国総研の街路樹の倒伏対策の手引き、東京都の標準仕様書)。木は上の方ほど勢いが強く、下の枝は光が足りずに弱りやすいからです。
量の目安もあります。葉のある時期の常緑樹の枝抜きは、切る量を全体の3分の1以下にとどめます(国総研の手引き、東京都の街路樹維持管理計画書)。米国では、1回に取るのは生きた樹冠の4分の1までが目安です(剪定の規格 ANSI A300、米国農務省森林局の手引き)。年数を重ねた大きな木ほど、取る量は少なくします。
仕上がりの目安は言葉にしにくいところですが、シラカシやタブノキなら、空が少し透けて見える程度まで込み入った枝を透かします(東京都の街路樹維持管理計画書)。樹冠の内側にも外側にも葉が残り、塊と塊の間から空と枝がまんべんなく見える。それが3つの段階を終えた姿です。

10月のいまは、常緑樹の透かしの適期です(横浜市の仕様書では9〜10月)。落葉樹は葉を落とした11〜2月頃に、枝の骨格を見ながら透かします。
職人の手順──遠目で決め、近目で仕上げる
職人の間では、透かしは大から小へ、遠目から近目へ、と言われます。まず木から離れて全体を眺め、どの太い枝を抜くかを決める。次に木に寄って中くらいの枝を整え、最後に脚立の上で、手の届く距離の枝先を仕上げる。見る距離と抜く枝の太さが、いつも組になっています。
この順序を逆にすると、うまくいきません。現場での経験から、先に枝先の細かい所を整えてしまうと、あとで太い枝を1本抜いたときに、そこだけ大きな穴が空き、せっかく揃えた枝先が台なしになります。太い枝を先に決めるのは、手間を省くためではなく、仕上がりを崩さないためです。
どこで手を止めるかも、職人の目が決めます。当社の現場での目安として、脚立から降りて木の下から見上げ、葉の間から空が少し透けて見えたら、その面の手入れは終わりにします。職人の間では、切った枝を地面に並べて、取った量を目で確かめる人もいます。京都御苑の松の手入れは「御所透かし」と呼ばれ、環境省の解説は、手入れをしたことに初めて気づくくらいの透かしだと説明しています。透かしの3つの段階は、その控えめな仕上がりにたどり着くための、順序の知恵だと思います。
海外の crown thinning との対応──海外の読者へ
透かし剪定は、海外の樹木管理(アーボリカルチャー)の crown thinning(樹冠の間引き)に当たります。ANSI A300 は thinning を、生きた枝の密度を下げるための選択的な剪定と定義し、枝が1本の枝の上でも樹冠全体でも均等に分布するよう残すことを求めています。内側の枝を取りすぎて枝先にだけ葉を残すライオンテールは、認められない作業とされています。
確かめた範囲では、英語圏の規格に、大・中・小透かしのように「どの段の枝で抜くか」で段階を名付けた区分は見当たりませんでした。規格は、剪定の種類と量(%)と枝の分布で作業を指定します。日本の透かしの3段階は、同じ目的を、枝の太さという庭師の手と目に合った物差しで組み立てたもの、と言えるかもしれません。
当社が掲げる GREEN MANAGEMENT の柱の一つは、科学的な知見(アーボリカルチャー)と現場経験の融合です。どれだけ抜くかは木の仕組みが決め、どの段の枝から手を付けるかは庭師の目が決める。透かしの3つの段階は、その二つをつなぐ手順だと考えています。
よくある質問(Q&A)
Q1. 大透かし・中透かし・小透かしとは何ですか?
A. 透かし剪定(枝抜き剪定)を、抜く枝の太さで分けた呼び方です。主枝の先から副主枝にかけての太い枝を分かれ目から抜くのが大透かし、副主枝の分かれ目から抜くのが中透かし、枝先の側枝だけを抜くのが小透かしです。
Q2. どの順番で透かしますか?
A. 太い枝から細い枝へ、大透かし、中透かし、小透かしの順に進めます。高さの方向では上の枝から下の枝へ進め、上の枝葉は強めに、下の枝葉は弱めに透かします。先に枝先を整えると、あとで太い枝を抜いたときに大きな穴が空いてしまいます。
Q3. 毎年、大透かしをする必要がありますか?
A. 毎年の手入れは、中透かしと小透かしの組み合わせが一般的です。大透かしは、長く手入れされずに込み合った木を作り直すときなどに行い、切り口が大きくなるので、庭木では数年に一度にとどめます。
Q4. 1回にどれくらい透かしてよいですか?
A. 葉のある時期の常緑樹は、切る量を全体の3分の1以下にとどめます。米国の規格や手引きでは、1回に取るのは生きた樹冠の4分の1までとされています。仕上がりは、葉の間から空が少し透けて見える程度が目安です。
Q5. 透かしの時期はいつですか?
A. 常緑樹は9〜10月頃が適期で、10月はちょうど常緑樹の透かしの時期です。落葉樹は葉を落とした11〜2月頃に、枝の骨格を見ながら透かします。
出典・参考情報
・国土技術政策総合研究所「街路樹の倒伏対策の手引き 第2版」国総研資料 第1059号、2019年(剪定の時期と量 1-83、大透かし・中透かし・剪定の順序 1-84)
・埼玉県県土整備部道路環境課「街路樹剪定マニュアル」令和2年12月(剪定の時期と量 5-4、枝透かし剪定の呼び方 5-8〜5-9。日本造園建設業協会『街路樹剪定ハンドブック』を引用)
・東京都建設局公園緑地部「街路樹維持管理計画書」令和3年12月(剪定の時期と切除量、樹種ごとの剪定の目安)
・東京都建設局「街路樹等維持標準仕様書(緑地管理編)」平成25年4月(枝抜き剪定と中すかし、上方は強く下方は弱く 8ページ)
・横浜市道路局「街路樹維持業務委託共通仕様書」令和8年2月(剪定の時期 18ページ、図1 剪定の方法と順序 22ページ)
・環境省 京都御苑「御所透かし」(観光庁 地域観光資源の多言語解説文データベース)
・American National Standards Institute「ANSI A300 (Part 1) Pruning」(ロングビーチ市の掲載資料。thinning、lion’s tailing)
・Bedker, P.J., O’Brien, J.G., Mielke, M.E.「How to Prune Trees」USDA Forest Service, NA-FR-01-95, 1995年(2012年改訂)
関連記事
・透かし剪定とは──日本の庭師が「抜いて整える」剪定の考え方|樹木医が解説
・枝抜き剪定とは──枝を付け根から抜く、庭師の基本の切り方|樹木医が図解
・切り戻し剪定とは──芽の上と分かれ目で切る、枝を短くする庭師の技|樹木医が図解
・忌み枝とは──切る枝の見分け方と、あえて残す枝|樹木医が図解
・剪定の切る位置はブランチカラー フラッシュカットとスタブカットを避けた、樹木にやさしい剪定
・自然風剪定 剪定をしていないかのような、その樹木らしい枝ぶりを保つ
株式会社トシ・ランドスケープ
樹木医 中村雅俊
English: Three Levels of Sukashi — Large, Medium and Fine Thinning in Japanese Pruning
O-sukashi, chu-sukashi and ko-sukashi (large, medium and fine thinning) are the names Japanese gardeners (niwashi and uekiya) give to sukashi, thinning, according to the thickness of the branches removed. The framework of the tree is adjusted with the thick branches, crowding is loosened at the medium branches, and the finish is made with the small twigs at the branch tips. In this illustrated article, a Jumokui (tree doctor) explains the order and the amount, with reference to Japanese public pruning standards and sources from abroad.
This is the sixth article in our series on the pruning techniques of Japanese gardeners. So far I have written about the idea of sukashi (thinning) and about two kinds of cut, eda-nuki (removal cuts) and kirimodoshi (cutting back). This time the subject is the level at which thinning is done: at which thickness of branch.
Thinning is divided into three levels by branch thickness
A tree’s branches become thinner step by step: thick main scaffold branches from the trunk, secondary scaffolds from the main branches, and laterals and twigs beyond them. Sukashi (eda-nuki, thinning) keeps this framework and adjusts the amount and density of branches and foliage by removing crowded branches at their forks.
The name changes with the level at which branches are removed. Removing thick branches, from the outer part of the main scaffolds to the secondary scaffolds, at their forks is o-sukashi; removing branches at the forks of the secondary scaffolds is chu-sukashi; removing only the laterals at the branch tips is ko-sukashi (NILIM, Guide to Preventing Street Tree Failure; Saitama Prefecture, Street Tree Pruning Manual). Cutting a main scaffold off at the trunk is called eda-oroshi and is treated separately from thinning.
The three are not separate techniques so much as a sequence used within the care of one tree, from thick to thin. In regular yearly care, a combination of chu-sukashi and ko-sukashi is the usual practice (Saitama Prefecture manual). O-sukashi is used on trees too crowded for that to keep up.
O-sukashi: adjusting the framework
A tree that has not been thinned for years is packed with foliage right into the inside of the crown, and from outside it looks like a heavy, rounded mass. The inner branches weaken for lack of light, branches rub against each other, and the wind cannot pass through.
On such a tree, the large-scale crowding is loosened first with the thick branches. Thick branches heading into the crown and those overlapping other thick branches are removed at their origin on the main scaffold. The cut is made just outside the swelling at the base of the branch (the branch collar) (on cutting at the branch collar).
After o-sukashi, the outline hardly changes, but large gaps open inside the crown and the way the trunk divides into main scaffolds becomes visible. The fine crowding at the branch tips is still there. From here, the tree is refined with chu-sukashi and ko-sukashi.
Removing thick branches means larger cuts. As a guide in our own work, o-sukashi on a garden tree is done once every few years, for example when rebuilding a tree that has gone a long time without care. From our experience in the field, the cuts of o-sukashi are less noticeable from outside if positions are chosen where they will be hidden in the shadow of the remaining branches.
Chu-sukashi: loosening crowding at the secondary forks
Chu-sukashi is thinning at the level of the secondary scaffolds, removing crowded branches at their forks. Overlapping branches, branches heading inward and branches running parallel to others are removed, so that the remaining branches stand at intervals on either side of the main branch. The way of identifying branches to remove is the same as in our imi-eda article.
The Tokyo Metropolitan Government’s standard specification for street trees also uses the term “chu-sukashi” for thinning overcrowded parts in removal pruning. In garden care, too, chu-sukashi is the core of yearly thinning.
Ko-sukashi: finishing with the twigs at the branch tips
Ko-sukashi removes only the laterals and twigs at the branch tips. Crowded overlapping twigs, downward-facing twigs and weak thin twigs are removed at their origins, so that the remaining twigs spread like a fan and small gaps open between the clumps of leaves.
Because the branches are thin, they are removed one at a time with ueki-basami (Japanese garden scissors). The gardener lifts the branch tip lightly with one hand and checks the origin of the twig behind the leaves before the scissors go in. It is this handwork of ko-sukashi that finally decides how the tree looks from outside.
Order and amount: thick to thin, top to bottom
There is an order to thinning: from thick branches to thin. The City of Yokohama’s specification says the usual order is eda-oroshi, removal cuts, cutting back, and heading. In terms of height, work proceeds from the upper branches to the middle and then the lower branches, thinning the upper foliage more strongly and the lower foliage more lightly (NILIM guide; Tokyo standard specification). The upper part of a tree grows more vigorously, while the lower branches tend to weaken for lack of light.
There are guides for the amount, too. When evergreens are thinned in leaf, the amount removed is kept to one-third of the whole or less (NILIM guide; Tokyo Metropolitan Government, Street Tree Maintenance Plan). The American pruning standard ANSI A300 and the USDA Forest Service guide state that no more than one-quarter of the living crown should be removed at a time. The older and larger the tree, the less is removed.
The finish is hard to put into words, but Tokyo’s Street Tree Maintenance Plan says, for evergreen oaks and Machilus, that crowded branches are thinned until the sky shows slightly through. Foliage remains both inside and outside the crown, and sky and branches show evenly between the clumps. That is the form after the three levels.
Now, in October, is the right season for thinning evergreens (September to October in the Yokohama specification). Deciduous trees are thinned around November to February, after leaf fall, while looking at the branch framework.
The craftsman’s order: decide from afar, finish up close
Among Japanese gardeners it is said that thinning goes from large to small and from far to near. First the gardener steps back, looks at the whole tree and decides which thick branches to remove. Next, closer to the tree, the medium branches are arranged, and finally, on the ladder, the branch tips within arm’s reach are finished. The viewing distance and the thickness of the branches removed always go together.
Reversing this order does not work. From our experience in the field, if the fine work at the branch tips is done first, removing one thick branch afterward leaves a large hole just there, spoiling the tips that had been so carefully arranged. Deciding the thick branches first is not a way of saving effort, but a way of not ruining the finish.
Where to stop is also decided by the craftsman’s eye. As a guide in our own work, we come down from the ladder and look up from under the tree; when the sky shows slightly through the leaves, that face of the tree is finished. Among gardeners, some lay the cut branches out on the ground to see by eye how much has been taken. The pine care at the Kyoto Imperial Garden (Kyoto Gyoen) is known as gosho-sukashi, and the Ministry of the Environment’s description explains it as thinning so subtle that one only just notices the tree has been cared for. The three levels of sukashi are, I believe, the wisdom of order that leads to such a restrained finish.
How sukashi corresponds to crown thinning: for readers outside Japan
Sukashi corresponds to crown thinning in arboriculture. ANSI A300 defines thinning as selective pruning to reduce the density of live branches, and requires that branches be left evenly distributed on individual limbs and throughout the crown. Lion’s tailing, in which too many inner branches are removed and foliage is left only at the tips, is regarded as unacceptable.
As far as I could confirm, English-language standards have no division that names levels by the tier of branch at which thinning is done, as o-, chu- and ko-sukashi do. The standards specify work by type of pruning, amount (percentage) and distribution of branches. The three levels of Japanese sukashi may be seen as building the same aim around a measure that suits the gardener’s hands and eyes: the thickness of the branch.
One of the pillars of our approach, GREEN MANAGEMENT, is the integration of scientific knowledge (arboriculture) with field experience. How much to remove is decided by how the tree works; which tier of branches to start from is decided by the gardener’s eye. The three levels of sukashi, I believe, are the procedure that connects the two.
Frequently asked questions
Q1. What are o-sukashi, chu-sukashi and ko-sukashi?
A. They are names for sukashi (thinning, eda-nuki) divided by the thickness of the branches removed. Removing thick branches, from the outer main scaffolds to the secondary scaffolds, at their forks is o-sukashi; removing branches at the forks of the secondary scaffolds is chu-sukashi; removing only the laterals at the branch tips is ko-sukashi.
Q2. In what order is thinning done?
A. From thick branches to thin: o-sukashi, then chu-sukashi, then ko-sukashi. In terms of height, work goes from the upper branches to the lower, thinning the upper foliage more strongly and the lower more lightly. If the tips are finished first, removing a thick branch afterward leaves a large hole.
Q3. Is o-sukashi needed every year?
A. Regular yearly care usually combines chu-sukashi and ko-sukashi. O-sukashi is done when rebuilding a crowded tree that has gone a long time without care, and because the cuts are larger, on garden trees it is limited to once every few years.
Q4. How much can be thinned at one time?
A. For evergreens in leaf, the amount removed is kept to one-third of the whole or less. American standards and guides state no more than one-quarter of the living crown at a time. The finish should let the sky show slightly through the leaves.
Q5. When is thinning done?
A. For evergreens, around September to October is the right season, so October is just the time for thinning evergreens. Deciduous trees are thinned around November to February, after leaf fall, while looking at the branch framework.
Sources
– National Institute for Land and Infrastructure Management (NILIM). Guide to Preventing Street Tree Failure, 2nd edition. Technical Note No. 1059, 2019.
– Saitama Prefecture, Road Environment Division. Street Tree Pruning Manual. December 2020 (citing the Japan Landscape Contractors Association, Street Tree Pruning Handbook).
– Tokyo Metropolitan Government, Bureau of Construction. Street Tree Maintenance Plan. December 2021.
– Tokyo Metropolitan Government, Bureau of Construction. Standard Specification for Street Tree Maintenance (Green Space Management). April 2013.
– City of Yokohama, Road and Highway Bureau. Common Specification for Street Tree Maintenance Contracts. February 2026.
– Ministry of the Environment, Kyoto Gyoen. Gosho-sukashi (Japan Tourism Agency multilingual commentary database).
– American National Standards Institute. ANSI A300 (Part 1) Pruning (copy published by the City of Long Beach).
– Bedker, P.J., O’Brien, J.G., Mielke, M.E. How to Prune Trees. USDA Forest Service, NA-FR-01-95, 1995 (revised 2012).
Masatoshi Nakamura
Jumokui (Tree Doctor), Toshi Landscape Co., Ltd., Tokyo